Power Flushing Step-by-step
A proper power flush will take a day to comlete, if it's been done right. But what does a plumbing engineer do, and why will it cure my heating problems?
The following story covers exactly what would be done by one of Turnkey's plumbing engineers, from the outset through to completion.
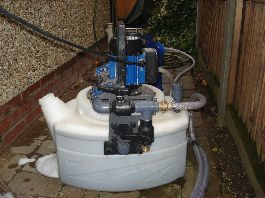
The first step in the process is to connect the Power Flushing Pump into the heating system, either across the valves on a standard circulating pump (see picture 3), across the tails of a radiator, or wherever is most practicable. However, to maximise velocity throughout the system the most effective position for the Power Flushing Pump will be on the pipes with largest cross-sectional area, that's why we recommend that it's connected as a replacement for the circulating pump in your heating system.
Once the pump is in place, the system has to be sealed to prevent a loss of pressure during the Power Flushing process. In an open vented heating system, where the heating circuit is usually fed by a small tank in the loft, a Turnkey Plumber will remove the tank and seal the two pipes eminating from it (see picture 4). The tank is then cleaned thoroughly, before being re-installed at the end of the job.
An initial water sample (see picture 5) taken from the heating system provides the engineer with an indication of the severity of the corrosion within the heating system, and will help them to determine which chemicals to use to speed up the cleaning process.
The powerful flow from the Power Flushing Pump (see picture 6), combined with instantaneous flow reverse device, will dislodge and mobilise deposits and corrosion which resist traditional system cleaning methods. Turnkey's Plumbers help promote this process further by using high speed drills to vibrate the content of individual radiators (see picture 8).
Initially, the plumber flushes clean water through the system to remove the larger deposits from within the syste. Any Iron Oxide will be pumped through the system to the magnaclean, where they will be held by a strong magnet (see pictures 9 & 10).
After completing an initial cleanse, the engineer then adds the chemical cleaner, either acidic (Kamco FX2 is highly recommended) or a non-acid (Kamco Hyperflush) based.
Once the corrosion and sludge deposits have been loosened and mobilised, fresh clean water is forced through the heating system, pushing the contaminated water (see picture 11) out through a full bore dump valve to a nearby drain. During the process, radiators are individually flushed, without removing or disconnecting them from the system, by directing the full output of the pump through each radiator separately.
At the end of the flushing process a water sample (see picture 13) is again taken from the system, and is thoroughly tested by Turnkey's Plumbing Engineer. Once our plumber is satisfied that the system contains fresh clean water (see picture 13), reinstatement of the system to normal operation takes only a few minutes.
System flushing will not remedy design or mechanical faults, which should be rectified, but in many cases it will cure the problems caused by these.


